Imagine gearing up for a big celebration, a sea of uninflated balloons at your feet, and the daunting thought of hundreds of tiny, finger-blistering knots ahead. Sound familiar? Tying balloons by hand is a notorious party-prep pain point, leading to sore fingers, cramped hands, and often, inconsistent or frustratingly loose knots. But what if there was a simple, ingenious device that could turn that arduous task into a swift, pain-free process? Learning How to Use a Balloon Tying Tool Effectively is the secret weapon many professional decorators and savvy party planners swear by.
This isn't just about speed; it's about comfort, consistency, and taking the literal ache out of balloon artistry. Let’s unravel the magic.
At a Glance: Tying Balloons Like a Pro
- Ergonomic Grip: Position the tool securely on your non-dominant hand for maximum comfort and control.
- Standard Knots: Wrap the balloon end once tightly around the tool's nose, guide it into the hollow, pull through, and slide off.
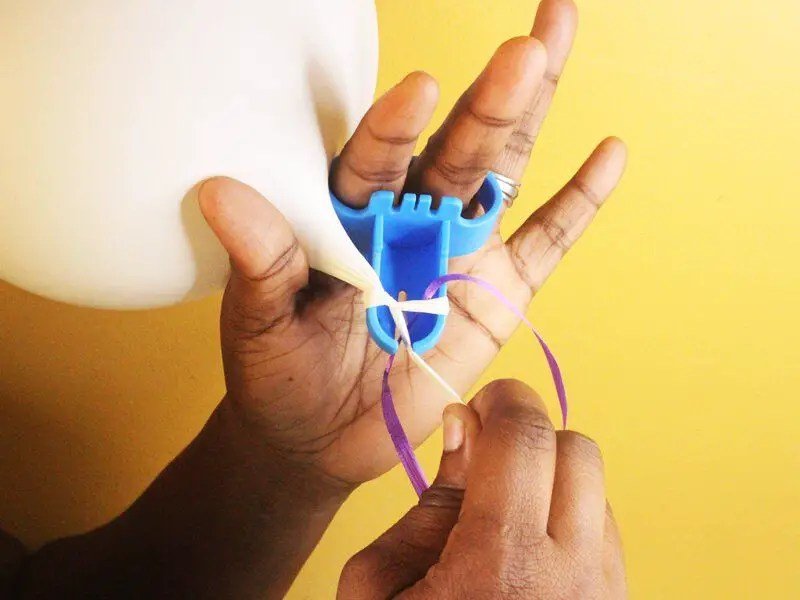
- Ribbon Ready: For ribbon-tied balloons, secure the balloon end in a tool slot and thread the ribbon underneath the stretched balloon.
- Tighten Smart: Always pull the balloon's end firmly after sliding it off to secure the knot.
- Pro Tip: For multiple balloons, twist their ends together like shoelaces before knotting.
- Untying Safely: A knitting needle can gently loosen knots without popping.
Beyond the Hand Knot: Why This Tool is a Game-Changer
Before diving into the mechanics, let's appreciate why this humble plastic gadget has earned its place in every serious balloon enthusiast's kit. Think about the cumulative strain of tying dozens, even hundreds, of balloons. Your fingers become raw, your knuckles ache, and dexterity wanes. A balloon tying tool steps in as an ergonomic savior, transforming a tedious chore into a smooth, almost meditative process. It's not just for the pros; anyone planning a party, crafting a balloon arch, or even just filling a room for a birthday will find immense value in this simple yet effective helper. It promises not just speed, but also uniform, tight knots every single time, giving your creations a polished, professional look.
Getting Started: Mastering Your Grip
The first step to effectively using your balloon tying tool is to establish a comfortable and secure grip. This isn't one-size-fits-all, so experiment slightly to find what works best for your hand.
Most balloon tying tools are designed with a specific contour that nests perfectly against your fingers.
The Standard Finger Placement (Palm-Facing Nose)
- Non-Dominant Hand: This is the hand that holds the tool and the base of the balloon while your dominant hand does the wrapping.
- Slide It On: Gently slide the tool onto your index and middle fingers. The goal is for the tool to feel like a natural extension of your hand, not something you're awkwardly gripping.
- Nose in Palm: Position the "nose" or hook of the tool so it points into your palm, with its open side facing your fingertips. This orientation provides a natural anchor point for stretching the balloon.
- Optional Ring Finger: For a truly rock-solid grip, some users find it helpful to also include their ring finger, giving the tool even more stability. This can be particularly useful when you're working with larger, more resistant balloons.
The Back-of-Hand Variation (Nose Away from Palm)
While less common, some individuals prefer to position the tool with its nose resting on the back of their hand. This might feel more intuitive for certain hand sizes or finger lengths. If the standard grip feels awkward, give this variation a try. The key is comfort and stability—you need to be able to stretch the balloon without the tool shifting around.
Whichever placement you choose, ensure the tool feels secure. A wobbly tool will lead to frustration and loose knots. Your fingers should provide a stable base, allowing the balloon to be stretched tautly around the tool's nose. Now that your tool is an extension of your hand, let's tie some balloons! For a closer look at the tools themselves, check out Your go-to balloon tying tool.
Step-by-Step: Tying a Standard Balloon Knot with Ease
This is the bread and butter of balloon decoration: creating a simple, secure knot on an individual balloon. Follow these steps for consistent, finger-friendly results.
The Core Technique for Perfectly Tied Balloons
- Inflate and Secure the Neck: First things first, inflate your balloon to your desired size. Immediately after inflation, pinch the very end of the balloon's neck (the part you just inflated through) between your thumb and index finger of your non-dominant hand. This prevents air from escaping and gives you a firm hold on the crucial tying section.
- Stretch and Wrap: With the balloon's end still pinched, use your dominant hand to stretch the neck of the balloon. Wrap it once tightly around the middle of the tool's nose. The tension here is key; a loose wrap will result in a flimsy knot. You should feel the balloon's material taut against the plastic.
- Cross and Tuck: Now, guide the free end of the balloon (the tail you're still holding with your dominant hand) across the wrapped section. Here's the critical move: push this free end into the hollow middle of the tool's nose and then guide it underneath the section of the balloon that is stretched around the tool. This action forms the core of your knot.
- Slide and Tighten: While continuing to hold onto the free end of the balloon, gently slide the entire balloon straight off the tool's nose. As it comes off, you'll see the knot beginning to form. Give the free end a firm pull to fully tighten the knot. Congratulations, you've just tied a perfect balloon knot without a single strained finger!
Common Pitfalls and Quick Fixes:
- Knot Too Loose: You likely didn't stretch the balloon's neck enough, or your initial wrap wasn't tight enough around the tool. Ensure maximum tension in step 2.
- Balloon Pops: You might be over-inflating the balloon, making its neck too thin and fragile. Or, you're pulling too aggressively when stretching. A firm, steady stretch is better than a violent yank.
- Can't Get the End Through: Ensure you're pushing the end into the hollow and underneath the stretched section. Sometimes angling the tool slightly can help guide the end.
Practice these steps a few times with spare balloons. You'll quickly develop the muscle memory needed to tie balloons with incredible speed and efficiency.
Elevating Your Decor: Tying Balloons with Ribbon
Adding ribbons to balloons elevates their presentation, whether for a bouquet, a ceiling full of floating accents, or attaching them to weights. The balloon tying tool makes this process seamless, ensuring the ribbon is securely integrated into the knot.
Integrating Ribbon into Your Balloon Knots
- Inflate and Pinch: Just like with a standard knot, inflate your balloon to size and pinch its neck between your thumb and index finger of your non-dominant hand.
- Stretch and Wrap the Balloon: Using your dominant hand, stretch the balloon's neck and wrap it tightly around the tool's nose. This initial wrap is identical to the standard knotting process.
- Secure the Balloon End: Most balloon tying tools have a small slot or notch either in the middle of the nose or near the base by your fingers. Secure the very end of the balloon's neck into this slot. This holds the balloon's end in place, freeing up your dominant hand for the ribbon.
- Feed the Ribbon: Now, take your ribbon. Feed one end of it into the open side of the tying tool. Critically, make sure the ribbon passes underneath the stretched section of the balloon where the knot will eventually form. This ensures the ribbon becomes an integral part of the knot, not just an afterthought.
- Cross, Tuck, and Finish: Take the free end of the balloon (which is still wrapped around the tool and secured in the slot) and cross it over the main wrapped section around the nose. Guide this end into the hollow part of the nose and feed it underneath the stretched section of the balloon, just as you would for a standard knot.
- Slide Off and Secure: With the ribbon in place and the knot structure formed, slide the balloon straight off the tool's nose. As you pull the balloon off, ensure the ribbon remains in its position. Finally, pull the balloon's end tight to fully secure the knot, encapsulating the ribbon firmly within it. Give the ribbon a gentle tug to confirm it's locked in place.
Why the Ribbon Slot Matters:
The small slot in the tool is a game-changer for ribbon tying. It acts as a temporary holder, allowing you to manipulate the ribbon without needing an extra hand or worrying about the balloon's end slipping. This thoughtful design simplifies what could otherwise be a fiddly, two-person job.
Expert Insights: Tips from Professional Balloon Artist Ahzahdeh Neshat
Professional balloon artists often develop clever tricks of the trade to handle large volumes of balloons or tricky situations. Ahzahdeh Neshat shares two invaluable tips that can save you time and frustration.
Speed Tying: Knotting Multiple Balloons Together
When you're creating a balloon garland, an arch, or a large cluster, you often need to tie two balloons together. Instead of tying each balloon individually and then trying to connect them, Neshat suggests a more efficient method:
- Take the Two Ends Together: After inflating two balloons, don't tie them individually. Instead, bring the necks of both balloons together.
- Twist Like Shoelaces: Treat these two balloon ends as if they were shoelaces. Twist them around each other, interlacing them firmly.
- Form a Single Knot: Once twisted, you can often form a single, secure knot using both ends simultaneously. This technique creates a strong bond between the two balloons quickly, streamlining the assembly process for larger structures. It's a fantastic time-saver for large-scale decorations.
The Gentle Art of Untying a Balloon
Sometimes, a balloon needs to be repositioned, or perhaps you've made a mistake with a cluster. Untying a balloon without popping it can seem impossible, but Neshat offers a brilliant solution:
- Grab a Knitting Needle: The key here is a tool with a blunt, tapered end that won't puncture the delicate balloon material. A knitting needle or even a crochet hook works perfectly.
- Work Into the Knot: Carefully insert the tip of the knitting needle into the center of the knot.
- Gently Loosen: With a soft, rotating motion, use the needle to work into the knot, gently stretching and separating the loops. This will loosen the knot enough for you to carefully undo it without damaging the balloon or causing it to pop. This is particularly useful for saving expensive or specialty balloons.
These professional techniques highlight how small adjustments in your approach can lead to significant improvements in efficiency and material preservation.
Troubleshooting Common Challenges
Even with the best tools and techniques, you might encounter a few snags. Here's how to navigate common issues like a seasoned pro.
My Knot Keeps Slipping!
This is almost always a tension issue.
- Solution: Ensure you're really stretching the balloon's neck taut before wrapping it around the tool. The initial wrap should be very firm. Also, once the balloon is off the tool, give the free end a decisive pull to cinch the knot tightly. Don't be shy with the final tug!
The Balloon Pops During Tying.
Frustrating, but often avoidable.
- Solution: Check if you're over-inflating the balloon. An overfilled balloon has a thinner, weaker neck that's prone to popping under pressure. Inflate to the recommended size (or slightly less if you're having trouble). Also, be firm but gentle when stretching; avoid sharp, sudden tugs.
I Can't Get the Balloon End Through the Hollow!
This can happen if the balloon material is sticky or if your fingers are getting in the way.
- Solution: Make sure you're guiding the end straight into the hollow and underneath the stretched part. Sometimes, rotating the tool slightly can create a clearer path. If your fingers are hindering the process, try adjusting your grip on the free end, perhaps holding it closer to the tip.
The Ribbon Comes Loose After Tying.
This means the ribbon wasn't properly integrated into the knot.
- Solution: Double-check that the ribbon passes underneath the stretched section of the balloon on the tool. If it's just lying on top, it won't be secured. Also, ensure you pull the balloon's end very tight after sliding it off to truly lock the ribbon in place.
My Fingers Still Hurt, Even with the Tool!
While the tool greatly reduces strain, prolonged use can still cause fatigue if your grip isn't optimal.
- Solution: Experiment with different tool placements. Try adding your ring finger for more stability, or switch to the "back-of-hand" grip if the palm-facing one feels unnatural. Take short breaks, stretch your hands, and ensure you're not gripping the tool itself too tightly. The tool should support your hand, not replace all effort.
Beyond the Basic Knot: Practical Applications & Benefits
Understanding how to use a balloon tying tool effectively opens up a world of creative possibilities and practical advantages that extend far beyond simply avoiding sore fingers.
Speed and Efficiency for Volume Work
Imagine assembling a balloon arch requiring hundreds of balloons. Tying each one by hand would be an all-day (and painful) affair. With a tying tool, you can significantly reduce your production time, allowing you to complete large-scale projects much faster. This efficiency is crucial for event planners, decorators, or anyone hosting a major celebration.
Knot Consistency and Professional Finish
Hand-tied knots can vary wildly in tightness and appearance. A balloon tying tool ensures every knot is uniformly tight and secure. This consistency contributes to a more polished, professional look for all your balloon arrangements, preventing balloons from deflating prematurely or knots from unraveling.
Ergonomic Benefits for Everyone
It's not just about speed; it's about accessibility. The tool protects your fingers from friction burns, blisters, and repetitive strain injuries. This makes balloon tying accessible to those with dexterity issues, arthritis, or simply anyone who wants to avoid discomfort. It transforms a potentially painful task into a manageable and enjoyable one.
When to Grab Your Tool (and When Not To)
- Use it for: Any situation where you need to tie more than a handful of balloons. Balloon arches, garlands, ceiling decor, large bouquets, or when preparing balloons for children's parties. It's especially useful for tying smaller balloons (like 5-inchers) where the neck is harder to grip by hand.
- Skip it for: Tying one or two balloons occasionally, or if you're using specialty balloons with very unusual neck shapes that don't easily conform to the tool. For balloon animal twisting, the knots are often integrated into the sculpt itself, so the tool isn't typically used.
Caring for Your Tool
Your balloon tying tool is likely made of durable plastic and requires minimal care.
- Cleaning: If it gets sticky or dirty from balloon residue, a quick wipe with a damp cloth and mild soap is usually sufficient. Rinse thoroughly.
- Storage: Store it in a clean, dry place where it won't get lost among other party supplies. Its compact size makes it easy to tuck into a craft box or kitchen drawer.
A well-maintained tool will be ready for countless parties to come.
Your Hands Will Thank You: The Final Word
The journey to becoming a balloon tying wizard might seem daunting at first, but with a reliable balloon tying tool and a bit of practice, you’ll be crafting beautiful, securely knotted balloons in record time. Forget the days of throbbing fingertips and inconsistent results. This simple gadget is a testament to how small innovations can make a significant difference in everyday tasks, especially when those tasks involve bringing joy and festivity to life.
So, next time you're planning a celebration, grab your tool, inflate those balloons, and tie away with confidence and comfort. Your fingers—and your fabulous party decor—will thank you.