If you've ever spent an hour before a party with aching fingertips, struggling with slippery latex and flimsy knots, then you know the true meaning of "party prep pain." Tying dozens, or even hundreds, of balloons by hand is a notorious chore, leaving many with sore digits, uneven knots, and a significant dent in their precious setup time. But what if there was a simple, inexpensive gadget that could transform this tedious task into a quick, uniform, and even enjoyable process? Enter the humble balloon tying tool – a small but mighty hero in the world of event decorating. This Buying Guide: Choosing Your Balloon Tying Tool is your definitive resource to understand, select, and master this game-changing accessory.
We're going beyond just telling you what these tools are; we’re diving deep into why you need one, how they work, and most importantly, how to choose the perfect one for your specific needs, ensuring your next event goes off without a hitch (or a sore finger!).
At a Glance: Your Quick Guide to Balloon Tying Tools
- What it is: A small, inexpensive gadget designed to simplify and speed up balloon tying.
- Why you need it: Saves time, prevents sore fingers, ensures uniform knots, increases efficiency for large events.
- How it works: A simple mechanism helps wrap and secure the balloon neck for quick knotting.
- Key considerations: Material (durability), ergonomics (comfort), functionality (ease of use, compatibility with balloon sizes), and cost.
- Who it's for: Anyone who regularly ties balloons—from home decorators to professional event planners.
- Bottom Line: A worthwhile, low-cost investment that pays dividends in comfort and efficiency.
Why Your Fingers Deserve a Break: The Magic of a Tying Tool
Imagine this: You're orchestrating a vibrant birthday party, a romantic wedding reception, or a grand corporate event. The decor needs to be perfect, and balloons are often the centerpieces, arches, or playful accents. You’ve got the inflator humming, the balloons puffing up beautifully, and then… the tying begins. For some, it’s a quick twist and a tug; for many, it’s a battle against elastic resistance, leading to red marks, blisters, and the dreaded "balloon hand" cramp.
This is precisely where a balloon tying tool steps in, not just as a convenience, but as an essential piece of your decorating toolkit. It’s built on a simple premise: provide a stable anchor and a guiding path for the balloon neck, allowing you to create a secure knot with minimal effort and maximum speed.
Beyond just preventing discomfort, these tools offer several compelling advantages:
- Time Savings: What might take you 10-15 seconds per balloon by hand can be slashed to just a few seconds with a tool. Multiply that by 100 balloons, and you’re looking at significant time saved.
- Consistent Knots: Ever notice some knots are tight, others loose, and some barely holding on? A tool helps you achieve uniform, secure knots every single time, leading to longer-lasting, more reliable displays.
- Increased Efficiency: For large-scale events or balloon businesses, efficiency isn't just a bonus—it's a necessity. These tools turn a bottleneck task into a streamlined operation, allowing you to focus on the creative aspects of your design.
- Minimal Learning Curve: Unlike some specialized crafting tools, a balloon tying tool requires very little practice to master. Most users grasp the technique within a few tries, making it accessible to everyone.
- Accessibility: For individuals with arthritis, dexterity issues, or simply less hand strength, these tools are a game-changer, making balloon decorating an activity everyone can enjoy.
In essence, a balloon tying tool is an investment not just in a gadget, but in your comfort, your time, and the overall quality of your balloon work.
Getting Down to Basics: How These Clever Gadgets Work
At its core, a balloon tying tool is elegantly simple. Most models are ergonomically designed to fit comfortably in your hand and feature a few key components that work in tandem to simplify the knotting process:
- The Handle: This is the part you grip, often contoured for comfort during repetitive use.
- The Slit or Hook: This is where you initially secure the stretched neck of the inflated balloon. It acts as an anchor point.
- The Groove or Notch: After wrapping the balloon neck around the tool, you tuck the end through this groove or notch, completing the knot.
- Optional Feeding Slot: Some advanced or specific designs may include a dedicated slot to feed the balloon neck through, offering an even more streamlined process.
The magic happens in how these components guide your hands to perform a consistent knot. Instead of pinching and fumbling, the tool provides a solid structure that makes the wrapping and tucking motions incredibly fluid.
Your Step-by-Step Guide to Tying Perfection
Using a balloon tying tool is surprisingly intuitive. Here’s a breakdown of the typical process, ensuring you get a perfect knot every time:
- Inflate Your Balloon: Inflate your balloon to your desired size. Hold its neck firmly, keeping it taut.
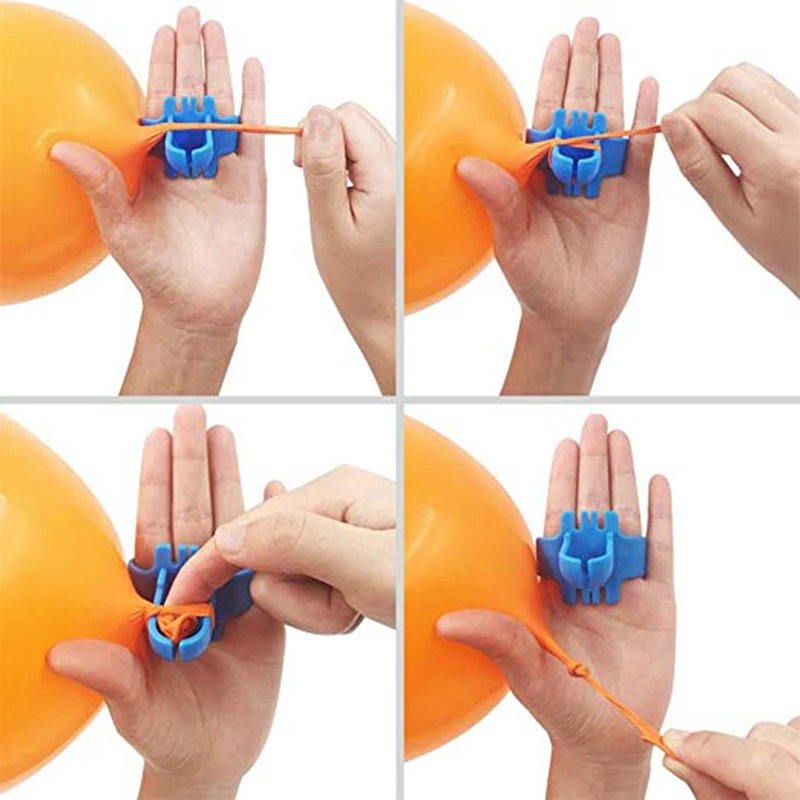
- Position the Neck: Take the stretched neck of the balloon and position it into the tool's designated slit or hook. Ensure it’s securely anchored.
- Wrap It Up: Wrap the balloon neck around the body of the tool at least once, sometimes twice, depending on the tool design and your desired knot security. This wrapping action creates the foundation of your knot.
- Tuck and Secure: With the neck wrapped, take the loose end of the balloon neck and tuck it through the tool’s notch, groove, or dedicated slot. This is where the knot starts to form.
- Pull Firmly: While holding the tool and the balloon, pull the end of the balloon neck firmly through the tuck point. You'll feel the knot tighten.
- Release and Remove: Once the knot is tight, gently remove the tied balloon from the tool.
- Check for Security: Give the balloon and its knot a gentle pull to ensure it's secure and won’t come undone.
With a little practice, these steps become second nature, and you'll be zipping through dozens of balloons in no time. For a deeper dive into balloon tying techniques and tools, you might find our comprehensive balloon tying tool guide incredibly helpful.
Navigating the Nuances: What to Look For in Your Tying Tool
While balloon tying tools are generally simple and inexpensive, choosing the right one can significantly impact your comfort and efficiency. It’s not just about grabbing the first one you see; it’s about considering the subtle differences that cater to your specific needs.
Material Matters: Durability and Longevity
The material of your balloon tying tool directly impacts its durability and how long it will serve you.
- Durable Plastic: Most tools are made from sturdy plastic. This is generally perfectly adequate for home use and even many professional applications. Look for tools made from high-quality, rigid plastics that don't flex or bend excessively when pressure is applied. They are lightweight and usually brightly colored, making them easy to spot.
- Metal: Less common, but some tools might incorporate metal components or be entirely metal. Metal tools tend to be more robust and can withstand greater force, potentially lasting longer. However, they can also be heavier and may cost slightly more. For high-volume, continuous use, a metal tool might be a worthy investment, but for most users, a good quality plastic tool is more than sufficient.
Consider how often you’ll be using the tool. An occasional decorator might be perfectly happy with a basic plastic model, while a professional balloon artist might prioritize the longevity of a more durable option.
Ergonomics: Comfort for Your Hands
This is perhaps one of the most critical, yet often overlooked, aspects of choosing a balloon tying tool. The whole point is to prevent hand strain, so a comfortable grip is paramount.
- Size and Shape: Tools come in various sizes and shapes. Some are sleek and minimalist, others are more substantial with contoured grips. If you have larger hands, a tiny tool might feel awkward. Conversely, if your hands are smaller, an overly bulky tool could be cumbersome. Pay attention to product images or, if possible, hold the tool in your hand before purchasing.
- Grip Texture: Some tools feature textured surfaces or rubberized grips. These can provide better traction, especially during long tying sessions, preventing the tool from slipping in your hand due to sweat or fatigue.
- Finger Grooves: Many designs incorporate finger grooves or specific contours that encourage a natural, relaxed grip, minimizing strain on your joints and muscles.
A tool that feels comfortable in your hand will significantly reduce fatigue and allow you to tie balloons for longer periods without discomfort.
Functionality & Compatibility: One Size Doesn't Always Fit All
While most tools are designed for standard latex balloons, their functionality and compatibility can vary.
- Simple Operation: The best tools are intuitive. They should make the tying process feel natural, not complicated. If a tool requires excessive steps or awkward maneuvering, it defeats the purpose of saving time and effort.
- Balloon Size Compatibility: Most tools work well with standard 10-inch, 12-inch, and even 16-inch latex balloons. However, if you frequently work with very small balloons (e.g., 5-inch) or unusually large ones (e.g., 24-inch or larger), double-check the product description. Some tools may be too large for tiny balloon necks or too small to comfortably wrap the neck of a giant balloon.
- Foil Balloon Compatibility: While primarily designed for latex, some tools can be used with certain foil balloons, particularly those with longer, more pliable necks. Always refer to the manufacturer's instructions for specific compatibility. Foil balloons are generally trickier to tie due to their material, and the knotting mechanism of these tools might not always be suitable.
- Multiple Balloon Tying: A useful feature for some tools is the ability to tie multiple balloon necks together at once. If you're creating balloon clusters or garlands, this can be a huge time-saver. Look for designs that allow you to overlap several balloon necks around the tool's body.
Cost: Balancing Price with Performance
Balloon tying tools are, thankfully, quite inexpensive. You can find basic models for just a few dollars, and even premium options rarely exceed the $10-15 range.
- Entry-Level (Under $5): These are usually basic plastic tools, often sold in multi-packs. They are fantastic for casual users, one-off events, or as backups. They might not have the most ergonomic design or advanced features, but they get the job done.
- Mid-Range ($5-$10): In this bracket, you'll start to see better quality plastics, more refined ergonomic designs, and perhaps some additional features or a more durable build. This is often the sweet spot for most regular decorators.
- Higher-End ($10-$15+): While rare, some tools may fall into this category, potentially due to specialized designs, premium materials (like metal), or inclusion in a larger kit. Consider if the extra cost provides a tangible benefit for your specific usage.
Given their low cost, it’s always better to invest in a tool that feels good in your hand and promises durability, rather than strictly opting for the cheapest option, especially if you plan on frequent use. The slight increase in price is a minimal trade-off for significantly improved comfort and efficiency.
Troubleshooting Common Tying Tool Tribulations
Even with the best tool, sometimes things don't go exactly as planned. Here are some common issues users encounter and how to troubleshoot them, ensuring your tying experience remains smooth:
- Popping Balloons:
- Cause: Often due to over-inflation, which stretches the latex too thin, or pulling the knot too tightly, creating excessive pressure at the base of the neck.
- Solution: Inflate balloons slightly less (leaving a small, soft spot near the neck) and use gentler, but firm, pressure when pulling the knot tight. You want a secure knot, not one that’s strangling the balloon.
- Loose Knots:
- Cause: Insufficient wrapping of the balloon neck around the tool. If you only wrap it once, the knot might not hold.
- Solution: Ensure you wrap the balloon neck around the tool at least once, or even twice, before tucking the end through the groove. This creates more friction and a tighter bind.
- Tearing the Balloon Neck:
- Cause: Excessive force when pulling the neck through the notch, or using a tool with a sharp edge or burr.
- Solution: Use a gentle, yet firm, pull. The goal is to secure the knot, not rip the latex. Inspect your tool periodically for any rough spots that might be catching the balloon. If found, a fine-grit sandpaper might smooth it, but often, replacement is best.
- Balloon Slipping Out of the Tool:
- Cause: Insufficient wrapping or improper securing in the initial slit/hook or the final notch/groove.
- Solution: Double-check that the balloon neck is firmly anchored at the start. Ensure you have enough wraps around the tool, and that the end of the neck is properly tucked and held in the designated slot before pulling.
- Compatibility Issues:
- Cause: Trying to use a tool designed for standard latex on very small, very large, or foil balloons that it wasn't intended for.
- Solution: Always refer to the manufacturer's instructions regarding balloon size and type compatibility. If a tool struggles with a specific balloon size, it might be worth investing in a different model or technique for those particular balloons.
Remember, practice makes perfect. A few initial hiccups are normal, but with these troubleshooting tips, you'll quickly become a master of the balloon tying tool.
Beyond the Basics: Expert Tips for Balloon Pros (and Enthusiasts!)
You’ve chosen your tool, mastered the tying technique, and now you’re ready to elevate your balloon game. Here are some additional insights to help you get the most out of your balloon tying companion.
Cleaning and Maintenance for Longevity
Balloon tying tools, being simple gadgets, don't require extensive maintenance. However, a little care can extend their lifespan.
- Wipe with a Damp Cloth: After use, especially if handling many balloons with residual powder, wipe the tool down with a damp cloth. This prevents build-up that could affect its smooth operation.
- Avoid Harsh Chemicals: Do not use abrasive cleaners or harsh chemicals, as these can degrade the plastic or metal over time.
- Ensure Dry Storage: Always ensure the tool is completely dry before storing it. Store it in a clean, dry place, perhaps in your balloon kit, away from direct sunlight or extreme temperatures.
Tying Multiple Balloons Together
Creating balloon garlands, clusters, or arches often requires tying multiple balloons together. Your tool can help with this!
- Overlap Necks: Inflate your balloons (usually two at a time for a simple cluster). Overlap their necks, positioning them together as if they were one thicker neck.
- Wrap Collectively: Feed these overlapped necks into the tool's slit/hook. Wrap them around the tool collectively, as you would a single balloon.
- Tie as Usual: Tuck the combined ends through the notch and pull firmly. This creates a secure, intertwined knot that holds the balloons together. This technique is a significant time-saver for large installations.
When to Replace Your Tool
Given their low cost, balloon tying tools are often seen as disposable.
- If it Breaks: If your tool develops a crack, a sharp edge, or any structural damage, replace it immediately. Repair attempts may not be effective and could cause injury or damage balloons. New tools are inexpensive, making replacement a far safer and more practical option.
- Loss of Ergonomics: If the tool no longer feels comfortable, perhaps due to wear and tear making the grip slick or rough, it's time for a new one. Your comfort is paramount.
- Upgrade Opportunity: If you find yourself frequently tying different balloon sizes or types, or if you're upgrading to more professional endeavors, consider replacing your current tool with one that offers better compatibility or enhanced ergonomic features.
Safety First: Supervising Children
While balloon tying tools simplify the process, they are not toys.
- Potential Choking Hazard: These tools often have small parts or can break into smaller pieces, posing a potential choking hazard for young children.
- Supervision is Key: Always supervise children when they are using or are around balloon tying tools, and store them out of reach when not in use. The focus should be on safe, effective balloon decoration for all ages.
Where to Find Your Next Tying Hero
Ready to get your hands on one of these time-saving marvels? Balloon tying tools are widely available and easy to acquire.
- Party Supply Stores: Your local party supply store is a great place to start. They often carry a selection of basic tools alongside their balloons and other party decor.
- Craft Stores: Crafting retailers often have sections dedicated to party and event supplies, where you'll likely find these tools.
- Online Retailers: Websites like Amazon, Etsy (from specialized sellers), and other e-commerce platforms offer the widest selection. You can compare different models, read reviews, and often find multi-packs or specialized tools. Look for bundles that include a hand pump and tying tools for maximum value.
- Specialty Balloon Suppliers: If you're a professional, ordering from a dedicated balloon supplier will provide access to professional-grade tools and bulk purchasing options.
Regardless of where you shop, check customer reviews for insights into durability, comfort, and ease of use.
Making the Smart Choice: Final Thoughts for Your Next Event
The decision to invest in a balloon tying tool isn't a frivolous one; it's a smart strategic move for anyone who regularly works with balloons. From the casual party planner looking to save their fingers to the seasoned decorator needing to streamline their workflow, this inexpensive gadget delivers significant returns in comfort, efficiency, and consistent quality.
By considering material, ergonomics, functionality, and cost, you can confidently choose a tool that will become an indispensable part of your decorating arsenal. Imagine future events where balloon tying is no longer a dreaded task, but a quick, pain-free step in bringing your creative visions to life. That's the power of the right balloon tying tool. So, go ahead, give your fingers the break they deserve, and embrace a smarter, faster way to bring joy with balloons!